Learn how to set up and manage group meetings in the vFairs Mobile App to facilitate seamless interactions between multiple attendees during your event.
Adding a Meeting Manually
-
Log in to the vFairs backend, open the Networking menu from the left navigation, and click Group Meetings.

This will take you to the Meetings screen. - On the Meetings screen, click on Add Meeting to begin adding a new meeting.

-
This will open a sidebar menu with various fields to help you create your meeting.

The table below explains each field and how it can be used for your meeting setup:
Field Name Field Type What is it for Meeting Title Text You can enter a title for your meeting. Meeting Description Multi-Line Text You can use this field to describe the agenda for the meeting for your guests. Meeting Type Drop-Down Menu You can use this to define whether it will be a physical or virtual meeting. Meeting Location
NOTE: This field appears only when ‘Physical’ is selected in the meeting type dropdown.
Drop-Down Menu You can use this field to select a meeting location from a range of drop-down values. Meeting Link
NOTE: This field appears only when ‘Virtual’ is selected in the meeting type dropdown.
Text Field You can use this field to provide the meeting like where you want all the guests to connect. Meeting Start Time Date/Time Selector You can use this field to set the start time for the meeting Meeting End Time Date/Time Selector You can use this field to set the end time for the meeting.
Meeting Organizer Search You can use this to search for an existing user through email or name and appoint them as the organizer for the meeting.
Add Guest Search You can use this function to find existing users and invite them for this meeting as guests.
- Click the Save button to finalize the addition of your meeting.
Importing Meetings into the System in Bulk
- To initiate the bulk import of meetings, click on the Import button located on the Meetings screen. This will allow you to upload a file containing all the relevant meeting data.

- Click the Download Template button to obtain a sample CSV file with predefined columns, which you can use to organize your meeting and guest information.

- After completing the file, click on the Upload CSV button to submit your document, enabling the system to generate meetings using the information provided within it.
- Once completed, you will see your meetings added to the Meetings Screen in listing view or calendar view:


Notify Invitees about scheduled meetings
To notify all invitees about the scheduled meetings, simply click on the Send Email button and confirm your action. This will trigger a notification email to be sent to each invitee, ensuring they are informed of the meeting details.

Configuring the Settings for Meetings
- To configure meetings, click on the Settings button.

- The settings section consists of 3 sub-sections:
- Book Meeting Rights: This section outlines the permissions assigned to various user roles, specifying which users are authorized to send meeting requests to other user types.

The table below explains each setting:
Field Title Field Type What is it for Attendee Rights Drop-Down Menu You can select which user types attendees are permitted to send meeting requests to. Admin Rights Drop-Down Menu You can select which user types Admins are permitted to send meeting requests to. Speaker Rights Drop-Down Menu You can select which user types Speakers are permitted to send meeting requests to. Show Email to User Type Drop-Down Menu You can select which user types will be able to see the email addresses of other guests. Booth Rep Rights Drop-Down Menu You can select which user types Booth Reps are permitted to send meeting requests to. Event Owner Rights Drop-Down Menu You can select which user types Event Owners are permitted to send meeting requests to. Show Rating in Group Meetings for Users Drop-Down Menu You can select which user types will be able to see a rating option for their meetings.
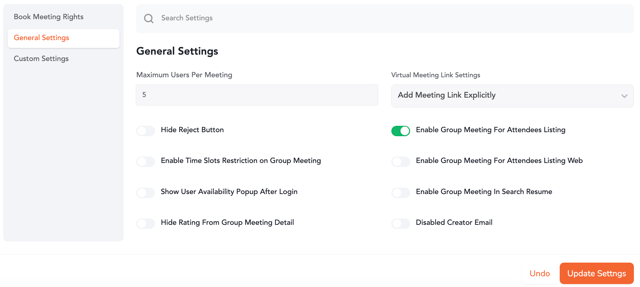
b. General Settings: - Book Meeting Rights: This section outlines the permissions assigned to various user roles, specifying which users are authorized to send meeting requests to other user types.

The table below explains each setting on the General Settings screen:
| Field Title | Field Type | What is it for |
| Maximum Users Per Meeting | Number | You can define the limit for users per meeting. |
| Virtual Meeting Link Settings | Drop-Down | You can select whether you want the user (organizer) to provide a meeting link or redirect them to the virtual chat within the app. |
| Hide Reject Button | Toggle | If this toggle is enabled, invite recipients won't be able to reject/decline meetings. |
| Enable Group Meetings for Attendees Listing | Toggle | If enabled, all users will be able to access the meetings feature from the Attendees listing in the app. |
| Enable Time Slots Restriction on Group Meetings | Toggle | If enabled, you will be able to restrict certain time slots for meetings. |
| Enable Group Meetings for Attendees listing Web | Toggle | If Enabled, all users will be able to access the meetings feature from the Attendees listing on the Web Platform. |
| Show User Availability Pop Up after login | Toggle | If Enabled, when a user logs in , they will be asked to provide their availability for meetings. |
| Hide Rating From Group Meeting Detail | Toggle | If enabled, rating option for the meeting will be hidden from the meeting details screen. |
c. Custom Settings: This section is for Developers to us. If you wish to use any of these settings, please contact the vFairs team.
Once all set, click on 'Update Settings' button seen at bottom right of the screen to save the settings.
